AGE VERIFICATION
This website requires you to be 21 years or older to enter. Please confirm your age below to continue.
This website requires you to be 21 years or older to enter. Please confirm your age below to continue.
This assorted medicated bacon rose bouquet recipe is perfect for any occasion, for all the bacon and chocolate lovers out there! Father’s Day, birthdays, anniversaries, job promotions, you name it.. there’s never a bad time for bacon. (; Even better, you can dress and garnish your bacon roses however you’d like, making it easy and incredibly fun to personalize your bacon roses.

**Note: Part of the beauty of making cannabis edibles is that you can infuse and medicate in endless ways. For example, I used cannabutter and cannabis coconut oil to medicate the chocolates for this bacon rose bouquet. For the non-chocolate “roses”, I used Good Day Farm’s Infused Hot Honey, which you may be able to find on our online ordering menu. Make sure that for your infusions, you use a dosage calculator to ensure and have confidence in the strength of each individual serving.

Step 1: Prep Flower Bouquet & Ingredients
If you purchased your fake roses from the store or had them handy at home, chances are they have been handled by other hands, and have gathered some dust. Since we’re working with food, I made sure to clean my fake rose bouquet before starting. To do this, I disassembled the green plastic rose bases, took the rose petals off, and washed all the stems and bases in my sink with water and mild dish soap, rinsing well and letting them out to dry. After drying, I reassembled the plastic rose bases and inserted toothpicks to help stabilize the bacon roses once finished.

While the fake roses were drying, I took this time to calculate my chocolate-to-infusions ratios. Using our website’s dosage calculator, I figured that I would add ¼ cup of cannabutter to 1 cup of white chocolate melting wafers, and ½ cup of cannabis coconut oil to 2 cups of dark chocolate melting wafers.

**Note: The amount of chocolate wafers I used left me with a lot more chocolate than needed for this recipe. I wanted to make a larger batch, so I could pour the leftover chocolate into molds, and have my own stock of chocolate to medicate with as needed. (:
Step 2: Making Your Bacon Flowers
Preheat your oven to 375°F and prep your pan for baking. I found it a huge time saver and a much quicker clean-up to line my muffin pan with tin foil. Next, you’re going to lay out your bacon and pour out your toothpicks, so they are handy as you’re rolling your bacon flowers.
Usually with bacon, you’ll find there is a meatier side, and a fattier side. To make the flower petal look, the goal is to start at the thinnest end of the bacon strip, rolling your bacon with the meatier side up. You want to be sure to keep the fattier side rolled tight, to make the rosette shape.
Once the rosette is made, stab a toothpick into the fattier end of the bacon to hold it in place. Add 3 more toothpicks around the flower so the bacon rose can sit on and hover above the muffin tin cup. Doing this ensures that the bacon cooks evenly and allows the grease to drip.

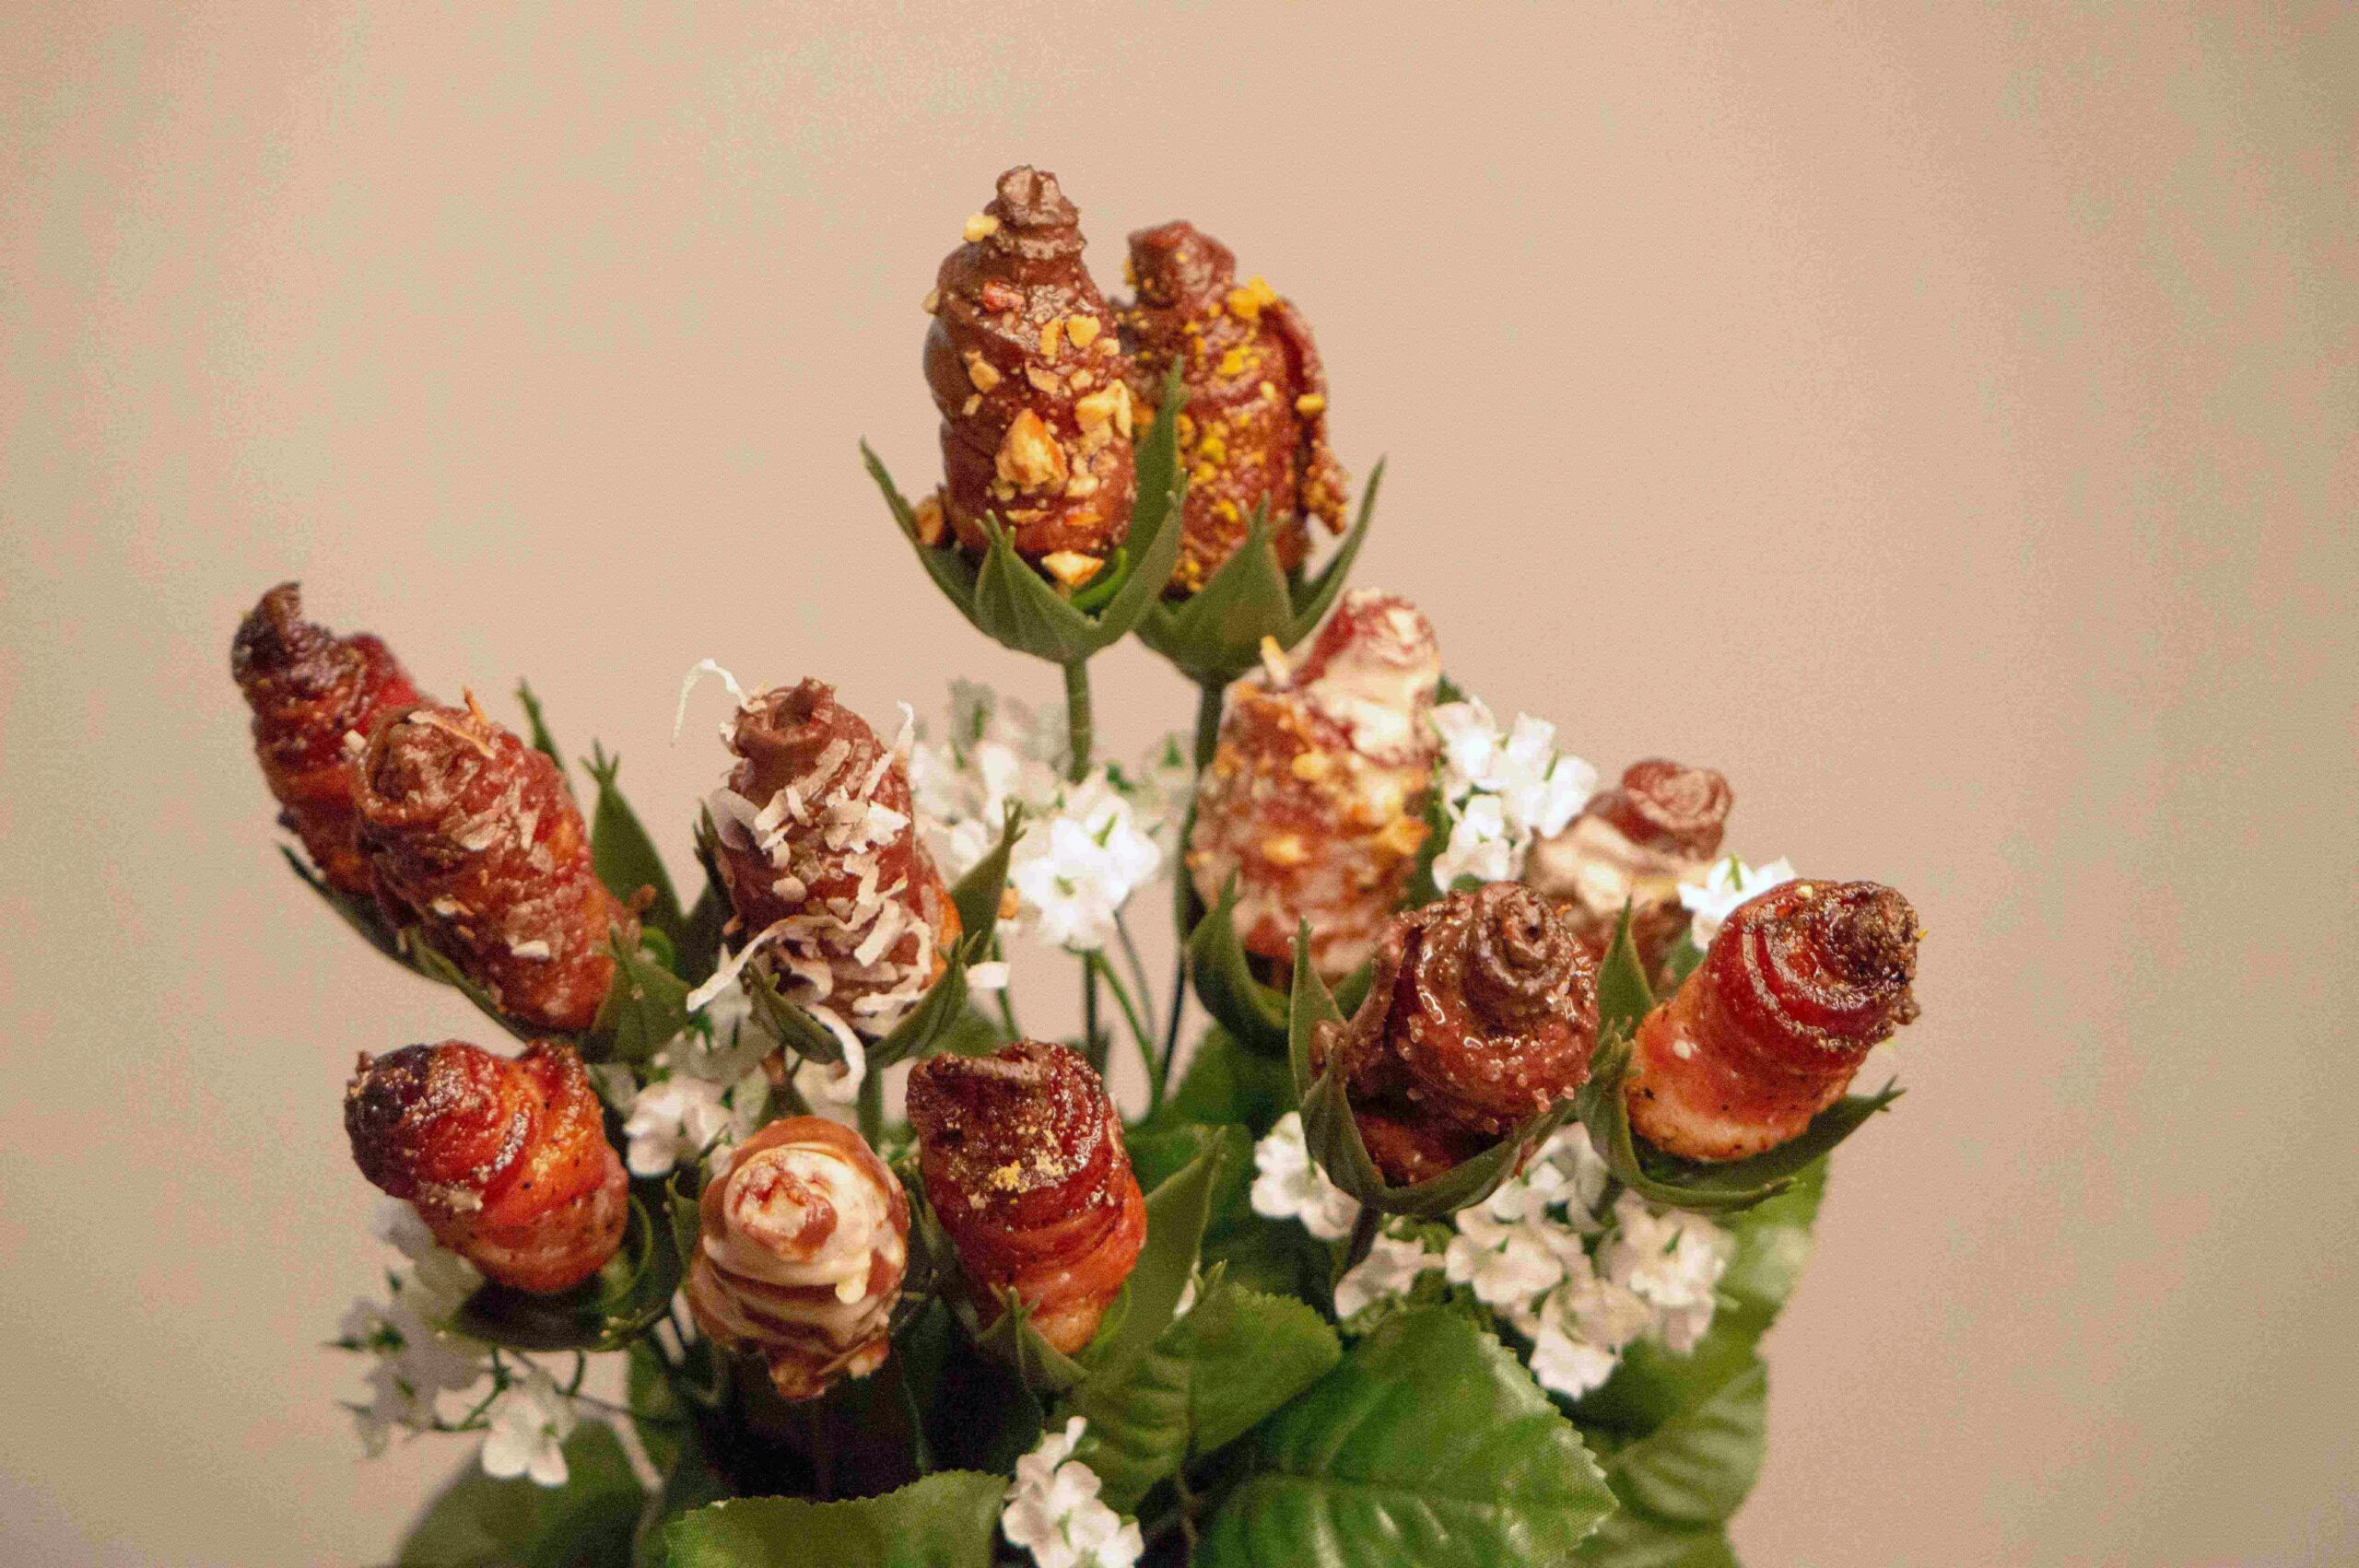
Since I wanted to make a variety of bacon roses, I used both cracked pepper bacon and regular thick-cut bacon. Have fun with this step and try your hand at different folds and twists. Not all roses are created equal, after all. (: Once rolled, place your bacon roses hovering with their toothpicks above each tin cup.


Step 3: Cooking the Bacon
Pop your muffin pan into your preheated oven, and bake for 40-50 minutes. Check at the 30-minute mark to see how they’re lookin’. If the tops of your bacon rosettes seem cooked while the bottoms need more time, loosely tent your muffin pan with tin foil to keep the tops from overcooking and getting too crisp.
I ended up baking my bacon roses for about 45 minutes, and they came out beautifully! I wanted to make a few black pepper candied rosettes, so I topped those with some of Good Day Farm’s Infused Hot Honey and brown sugar and popped them back into the oven for the last 5 minutes so they could caramelize.


After you’ve baked your roses, set them aside to cool until you can handle them comfortably. Remove all the toothpicks from your bacon roses and set them aside to cool completely.

Step 4: Melting & Medicating Your Chocolate
Using a double boiler (I make shift my own double boilers and needed 2 of them for the white and dark chocolates) fill the bottom chamber with water, and put your wafers in the top, setting your stove top to medium-low heat. It is very important that you do not put a lid on your melting chocolate and keep the water from boiling. This risks the chance of your chocolate seizing or getting clumpy.

Once your chocolate is melted, mix in your calculated and measured infused coconut oil or cannabutter. Add ¼ teaspoon of sunflower lecithin to each infused chocolate, and mix well. Not only will the sunflower lecithin help bind your ingredients, but it also lengthens shelf life, helps your body’s absorption of cannabinoids, and improves structural integrity. Especially when pouring your medicated infusions into molds.
Step 5: Dressing Your Bacon Roses
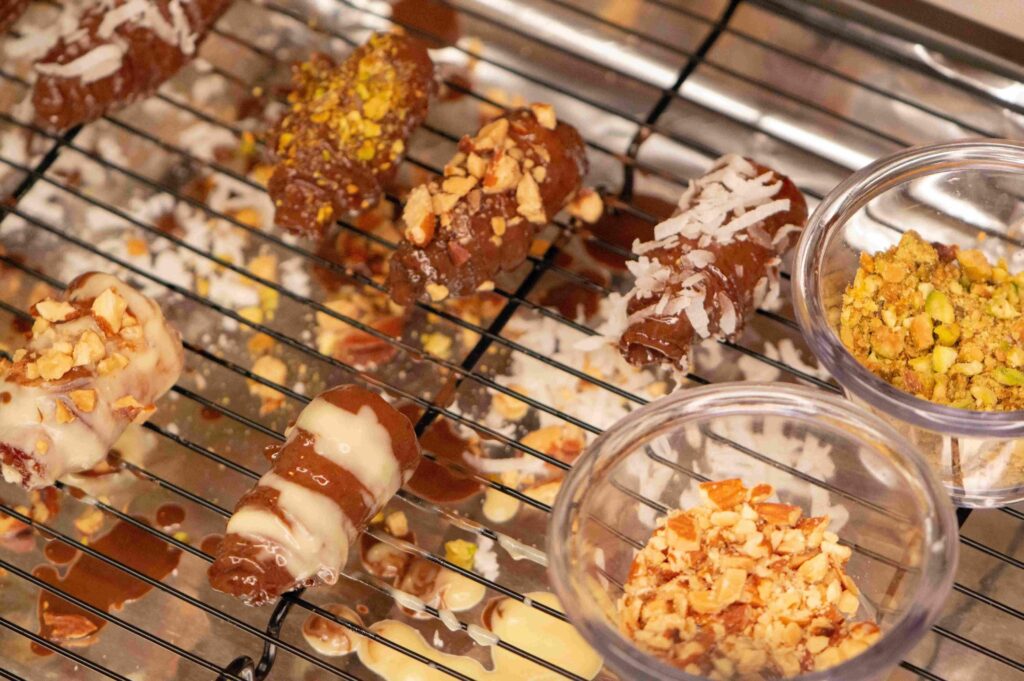
Now this is the fun part, dressing your bacon roses! You can simply dunk your bacon rosettes into the medicated melting chocolates. You can drizzle different patterns if you’d like or go really crazy and top them with a variety of toppings of your choice.
I wanted to go for an assorted variety, so I pulled out coconut flakes, almonds, pistachios, and cracked sea salt. This gave me a variety of bacon roses to suit a wider range of tastes and preferences. Placing them on a foil-lined pan with a rack made this process incredibly easy, and allowed me to dress all sides of the roses with minimal mess or smudging the chocolate.

Step 6: Assembling the Bacon Roses
Place your medicated and dressed rosettes on the toothpicks you’ve inserted into your cleaned fake rose stems. You may have to play around with the flower base and stems, pushing the toothpicks in further for a firmer hold. I found that the roses weighed the stems down some, so I utilized the fake rose petals we took off in the beginning, and stuffed them into a vase, cushioning the rose stems. I also tied some craft twine around the stems to hold them together and tied the same twine around the neck of the vase and into a bow, which led to a very lovely, finished presentation! And there you have it.


Enjoy!!
Cooking with Cannabis-Infused Ingredients
A good starting point for ingesting cannabis edibles is to limit yourself to <5mg THC ; even less if you are new to THC-infused food. They can have the tendency to be stronger, more intense, and can differ drastically from smoking. For one, the effects can take anywhere from a half hour to 3 hours to fully metabolize, depending on an individual’s unique body and metabolic rate. In addition, because the THC is digested through your liver and can more readily cross the body’s blood-brain barrier, the high can be stronger and last longer. With that said, your edible’s potency depends on many factors; how it was prepared, the potency of your starting product, as well as considering the strain or concentrate’s cannabinoid and terpene concentrations. To test the potency and effect of your finished product, try a smaller amount (<5mg) and see how that dose affects you after 2-3 hours. Titrate your dose as desired, and you can then use this personalized “standard” dose as a baseline for your recipes.
**Check out our dosage calculator for help in calculating your edible’s dosage @:
https://www.plant-family.com/thc-dosage-calculator/ **
Happy Cooking!